How to connect ChatGPT to a WordPress using MCP: detailed steps

Connecting ChatGPT to a WordPress website is now a practical option for teams that want to speed up content management, review articles, create drafts, or read website data directly from a chat. The idea depends on MCP, a method that allows AI apps to connect to external tools and services in an organized way. OpenAI explains that custom apps in ChatGPT can be built using the Model Context Protocol so ChatGPT can call approved tools and retrieve information from services.
In this short guide from Wordian, we explain how to connect ChatGPT to WordPress using the MountDev AI MCP Connector plugin, with one important note: test the connection first with read-only commands before allowing any command that writes or edits content inside the website.
What do you need before connecting ChatGPT to WordPress?
Before you start, make sure you have the following:
| Requirement | Why you need it |
|---|---|
| WordPress admin access | To install the plugin and enable connection settings |
| MountDev AI MCP Connector plugin | To turn your WordPress website into an MCP Server |
| A ChatGPT account that supports app creation | To create a custom MCP app |
| A website URL that works over HTTPS | Secure connections need a trusted HTTPS link |
| A safe place to store Client ID and Client Secret | These are sensitive values and should not be shared |
The MountDev AI MCP Connector plugin is listed in the WordPress plugin directory as a plugin that connects ChatGPT, Claude, and other MCP-compatible AI clients directly to WordPress, with OAuth 2.0 support for ChatGPT and generated Client ID and Client Secret values.
Step 1: install MountDev AI MCP Connector in WordPress
Start from your WordPress dashboard.
How to connect ChatGPT to WordPress through MCP
- Go to Plugins.
- Click Add Plugin.
- Search for: MountDev AI MCP Connector.
- Install the plugin, then activate it.
After activation, go to:
Settings → MCP ConnectorThen open the following tab:
ChatGPT OAuth

From this tab, copy these values:
- Client ID
- Client Secret
Save them temporarily in a secure place. Do not send them in a public chat, shared document, or unsecured email.
Step 2: copy your MCP Server URL
You will need your website’s MCP URL in this format:
https://yourdomain.com/wp-json/mountdev-ai-mcp-connector/v1/messagesReplace:yourdomain.com
Example:
https://example.com/wp-json/mountdev-ai-mcp-connector/v1/messagesThe plugin directory mentions this endpoint as the main MCP endpoint for the WordPress connection.
Step 3: create a new app inside ChatGPT

Open ChatGPT, then follow these steps:
- Go to Settings.
- Choose Apps.
- From Advanced settings, enable or use the option to create a custom app when available.
- Click Create app.
OpenAI explains that developer mode and full MCP support are available for specific workspace plans, and that admins or authorized users may need to enable developer mode before creating and testing custom MCP apps.
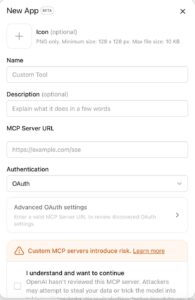
Fill in the fields as follows:
-
Name: write a clear name, such as:
WordPress MCP -
MCP Server URL: add your website URL:
https://yourdomain.com/wp-json/mountdev-ai-mcp-connector/v1/messages -
Authentication: choose:
OAuth
Then open Advanced OAuth settings.
Step 4: add OAuth details
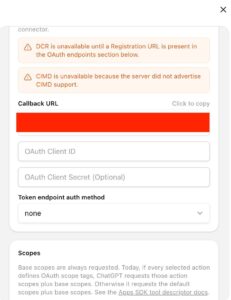
Inside the advanced OAuth settings:
- In the OAuth Client ID field, add the Client ID you copied from WordPress.
- In the OAuth Client Secret field, add the Client Secret.
- Leave the Scopes field empty unless the plugin gives you specific values to add.
- Click Save or Create to save the app.
After saving, click Connect or Authorize to start authorization.
ChatGPT will redirect you to WordPress. Approve the connection request from the authorization page, then return to ChatGPT after the process is complete.
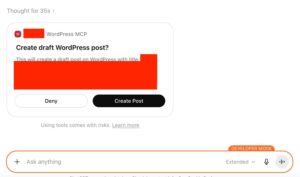
Step 5: test the connection with a safe command
After the connection is successful, open a new chat in ChatGPT.

Click the + button, choose More, then choose the app you created, such as:
WordPress MCPStart with a read-only command, such as:
Show the latest 5 articles on the website without editing anything.Do not start directly with publishing or editing commands. OpenAI notes that custom MCP apps can allow ChatGPT to take actions in connected tools, including write or modify actions, so gradual testing is the safer workflow.
After confirming that reading works correctly, you can try a command such as:
Write a draft article titled: How to improve WordPress articles for SEO, and save it as a draft only.Common mistakes when connecting ChatGPT to WordPress
Before trying again, review these points:
- Make sure your website URL starts with https.
- Make sure Client ID and Client Secret are copied without extra spaces.
- Make sure the plugin is activated.
- Make sure your WordPress account has admin permissions.
- Test a read-only command before any editing command.
- Do not give the connection wider permissions than needed.
Do you need help building a content workflow inside WordPress?
Connecting ChatGPT to WordPress can reduce part of the daily workload, but it still needs a clear content plan and human review before publishing. At Wordian, we help companies build useful content that serves readers and supports search visibility through:
- Content and SEO consultation sessions
- Website content and landing page writing
- SEO audit and crawling
- Technical SEO services
Wordian is a content and SEO agency that helps teams and companies turn content and SEO tools into measurable performance.
FAQs about ChatGPT and WordPress connection issues
1. Why does the Create app option not appear inside ChatGPT?
The Create app option may not appear if developer mode is not enabled or if your plan does not support custom MCP apps. Open Settings → Apps and check Advanced settings. If the option still does not appear, try updating the app or using ChatGPT on the web.
2. Why does the ChatGPT connection fail even after adding the MCP Server URL?
The most common reason is an incorrect MCP URL or a domain that does not work over HTTPS. Make sure the URL follows this format:
https://yourdomain.com/wp-json/mountdev-ai-mcp-connector/v1/messagesReplace yourdomain.com with your real website domain.
3. Why do I get an error after entering Client ID and Client Secret?
The values may have been copied with an extra space at the beginning or end. Copy Client ID and Client Secret again from the plugin settings inside WordPress, then paste them exactly as they are.
4. Why am I not redirected to the WordPress authorization page?
The MountDev AI MCP Connector plugin may not be active, the website URL may be blocked, or WordPress permalinks may need to be refreshed. Go to Settings → Permalinks and click Save Changes without changing anything, then try again.
5. Why do I see a 404 page when opening the MCP URL?
A 404 message usually means the plugin is not active or the WordPress REST API route is not working. Check that the plugin is enabled, refresh permalinks, and make sure your security plugins are not blocking the REST API.
6. Why does ChatGPT ask for Scopes, and what should I write?
Leave the Scopes field empty if the plugin does not provide specific values. Do not add random scopes, because they may prevent authorization or cause a connection error.
7. Why does the connection work, but ChatGPT cannot show articles?
The connected WordPress user may not have enough permissions, or the app may not have completed authorization correctly. Disconnect the app, authorize it again using an admin account, and start with a simple read-only command such as: “Show the latest 5 articles only.”
8. Why can’t ChatGPT create a draft article?
Writing permissions may not be enabled in the plugin or may not be available for the connected WordPress user. Review MCP Connector settings inside WordPress and make sure the connected account has permission to create posts or drafts.
9. Why do I see Unauthorized or Access Denied?
This usually means authorization is incomplete or the OAuth values are wrong. Delete the app from ChatGPT, then create it again using updated Client ID and Client Secret values from WordPress.
10. Why does the connection stop working after it was working before?
This may happen after a plugin update, a security settings change, a website URL change, or regenerated OAuth credentials. Review the MCP URL, make sure the plugin is still active, then reconnect the app from ChatGPT if needed.